A steel building is only as accurate as the components that arrive on site. Once columns, rafters, and purlins are shipped, a misplaced bolt hole or a mismatched splice is no longer a quick workshop fix. It becomes an idle crane crew, a delayed handover, a disrupted installation schedule, and an argument over who pays for rework.
Factory Acceptance Testing (FAT) is how experienced buyers prevent that. It moves the moment of discovery from a remote construction site to the manufacturer’s own plant, where tools, skilled welders, and replacement material are close at hand. This guide explains what FAT means for prefabricated steel structures, what to inspect before shipment, why a trial assembly of key frames is worth the effort, how to handle defects, and how to write FAT into your purchase contract. It is written for project managers, QC engineers, and construction supervisors who import steel buildings for warehouses, workshops, and factories.
What Is Factory Acceptance Testing for Steel Structures?
Factory Acceptance Testing is a documented verification, carried out at the manufacturer’s plant before shipment, that the fabricated steel meets the approved drawings, the specification, and the contract.
In other industries, FAT often means powering up and running equipment. For steel buildings, it is mostly inspection and measurement. It covers documents, materials, dimensions, welds, bolt holes, coatings, trial assembly, and packing. The goal is simple: confirm that what is about to be loaded onto a truck or container is what you ordered, and that it will fit together on site.
FAT vs. Related Inspections
Contracts and suppliers use several overlapping terms, so it helps to define them early:
- Factory Acceptance Testing (FAT): the full pre-shipment verification of fabricated components, usually with buyer or inspector witnessing.
- Pre-shipment inspection (PSI): often used for the final check of quantity, condition, and packing before loading. In some contracts it is the same thing as FAT.
- Third-party inspection: an independent agency appointed to witness or carry out checks on the buyer’s behalf.
- Trial (pre-)assembly: one part of FAT, in which selected components are bolted together in the plant to verify fit.
- Site acceptance: checks carried out after delivery or erection, at the project location.
Whatever the names, what matters is that the scope is agreed in writing before fabrication ends.
Why FAT Matters for B2B Buyers
Errors found in the fabrication plant cost the least to fix. The same error found on site, after shipping, costs more, because it adds freight, site labor, equipment standby time, and schedule risk. In remote or export projects, replacement steel may take weeks to fabricate, ship, and clear customs. FAT also gives you three practical benefits:
- Fewer surprises at erection. Connections that fit in the plant are far more likely to fit on site.
- A documented record. Signed inspection reports settle disputes about workmanship quickly.
- A clear release point. Shipment happens only after the buyer or an appointed inspector accepts the goods.
FAT does not replace good design or good site practice. It is one control in a chain that also includes site preparation and erection quality, which our steel factory building project planning guide covers from design to installation.
The FAT Workflow at a Glance
A well-run FAT follows a logical order: documents first, then materials, dimensions, welds, trial assembly, coatings, accessories, and finally packing and release. Each stage should produce a record, and shipment should be released only after the last stage is signed off.
Step 1: Review the Documents Before You Inspect the Steel
Start at the desk, not on the shop floor. Before anyone measures a member, confirm that the paperwork is complete and current:
The manufacturer’s quality management process should also follow ISO 9001 quality management standards to support consistent inspection and quality control.
- Approved fabrication (shop) drawings, with the latest revision number
- Mill test certificates (MTCs) that match the specified steel grade, such as Q235 or Q355, which Welldone Steel lists for its workshop and factory buildings
- Welding procedure specifications (WPS) and welder qualification records
- Bolt, paint, and galvanizing certificates
- An inspection and test plan (ITP) listing each check, its acceptance criteria, and its hold points
If the heat numbers on the certificates cannot be traced to the actual plates and sections, stop and resolve that first. Traceability is the foundation of everything that follows.
Step 2: Verify Materials and Member Identification
Walk the stockyard and the fabricated components. Check that section sizes, plate thicknesses, and grades match the drawings. Every member should carry a legible mark that matches the drawing and the packing list.
Clear marking also speeds up site erection. When an installation crew can identify each column, rafter, and brace without guessing, erection is faster and the chance of installing a piece in the wrong place falls.
Step 3: Check Dimensional Tolerances
Dimensional errors are the most common reason steel does not fit on site. Typical checks include:
- Overall member length and section depth
- Straightness and camber of columns and rafters
- End-plate squareness and flatness
- Bolt hole spacing, edge distance, and hole diameter
- Splice and base plate dimensions
- Position of brackets, cleats, and secondary-member connections
Inspectors normally use calibrated tapes, templates, and, for larger frames, total stations or laser measuring tools. Measuring instruments should be within their calibration date, and you can ask to see the certificates.
The acceptance limits should come from the project specification or the governing standard named in the contract. Do not rely on an informal “close enough” agreement. If the contract does not name tolerances, agree on them before fabrication, not at inspection. Recording actual readings, not just “OK,” lets you spot trends, such as holes that are consistently drilled slightly off.
Step 4: Inspect Welds, Including Non-Destructive Testing
Welds carry the load between members, so they deserve the most rigorous review. A sound FAT weld review usually has two layers:
- Visual inspection of all welds for size, profile, undercut, cracks, porosity, and spatter
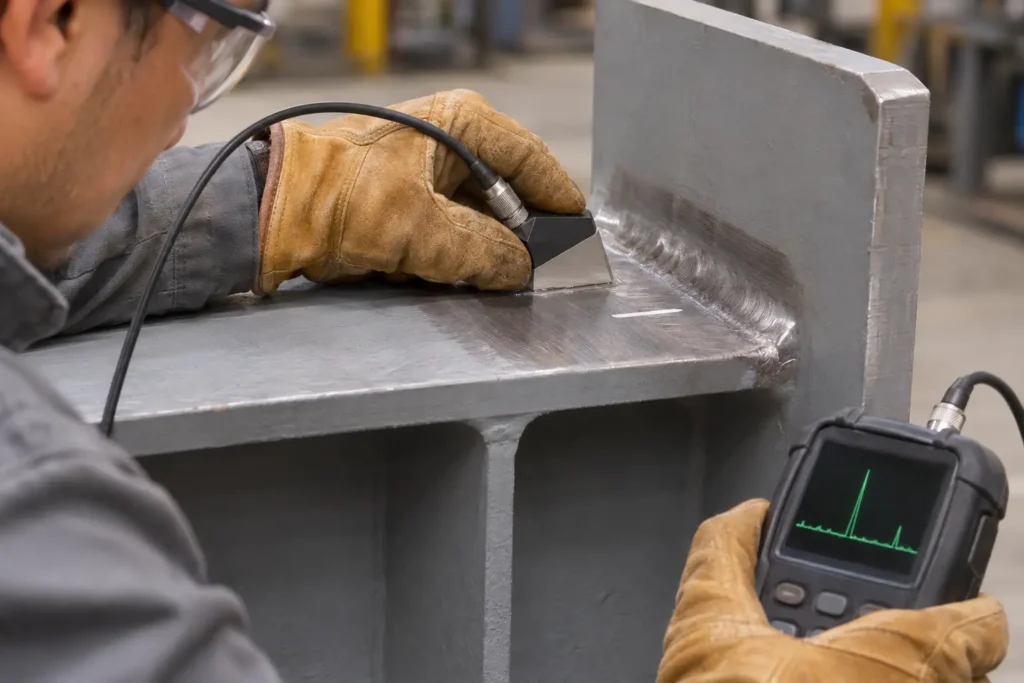
- Non-destructive testing (NDT) on selected welds, as defined in the specification
Common NDT methods include:
- Ultrasonic testing (UT): detects internal flaws in full-penetration welds
- Magnetic particle inspection (MPI): reveals surface and near-surface cracks in magnetic steel
- Dye penetrant testing (PT): an alternative for surface-breaking defects
The scope of NDT, such as which joints and what percentage, should be set in the contract. Critical connections, such as full-penetration welds at rafter-to-column joints, are the usual candidates. Depending on the specification, standards such as AWS D1.1, EN 1090 with EN ISO 5817, or GB 50205 are commonly cited for weld quality and acceptance. Confirm which one your project actually applies, and make sure the NDT operator’s qualifications are documented.
Step 5: Perform a Trial Assembly of Key Frames
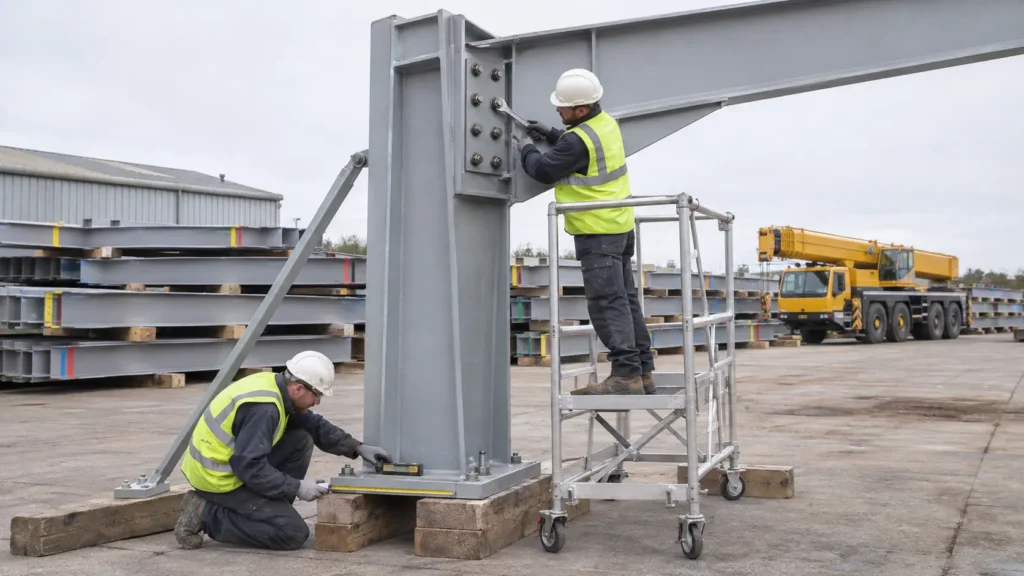
A trial assembly is the strongest single check in a steel FAT. Instead of trusting measurements alone, the fabricator bolts selected components together in the plant, just as the erection crew will on site.
What it reveals:
- Bolt holes that do not align across splice or end-plate connections
- Gaps, twists, or camber errors between adjoining members
- Incorrect overall span, ridge height, or column spacing
- Misplaced brackets, such as crane beam brackets or bracing connections
- Match-marking problems that would confuse the erection team
How it is usually done:
- Assemble one or more representative frames, usually the most complex or most repeated type, plus any frame with unusual connections.
- Support the frame on level ground or stands, then bolt the connections, using temporary or full bolting as agreed.
- Measure the assembled geometry against the drawing, including span, height, slope, and diagonal lengths to confirm squareness.
- Photograph and record the results, then dismantle and pack.
Assembling every frame is rarely economical, so the contract should state which frames or connections are to be assembled. For large-span or crane-supporting frames, which have more splice joints and tighter fit requirements, a trial assembly is especially valuable. Some fabricators also use 3D scanning to compare the fabricated geometry with the design model. If digital checks are proposed, ask what method is used and what tolerance is applied.
Step 6: Check Coatings and Surface Treatment
Protective coatings are easy to damage between fabrication and erection, so they should be verified before packing. Typical checks include:
- Surface preparation quality, such as blast cleanliness, where specified
- Dry film thickness (DFT) readings for painted members
- Zinc coating thickness for hot-dip galvanized members, commonly assessed against ISO 1461 where specified
- Visual defects: runs, bare spots, damage, and areas needing touch-up
- Condition of contact surfaces and bolted connection faces
Welldone Steel lists hot-dip galvanized and painted finishes on its product pages, so the contract should say which one applies to your project and what thickness you require. If the building will be near the coast, review the coating choice carefully. Our guide to corrosion protection for steel buildings in coastal environments compares hot-dip galvanizing and protective painting.
Step 7: Verify Bolts, Secondary Members, and Accessories
The main frame gets the attention, but missing small parts stall erection too. Check:
- High-strength bolts, nuts, and washers: quantity, grade, and certificates
- Anchor bolts and setting templates: anchor bolt accuracy on the foundation is critical, so confirm the layout against the base plate holes
- Secondary members: C/Z purlins, girts, bracing, and tie rods
- Roof and wall cladding, including sandwich panels where specified: sizes, color, core type, and edge condition
- Flashings, gutters, doors, and windows against the bill of materials
A useful habit is to reconcile the packing list against the drawings and the bill of materials, line by line. Shortages that are found before shipment can be fixed in days. Shortages found on site can pause erection.
Step 8: Inspect Packing, Marking, and Loading
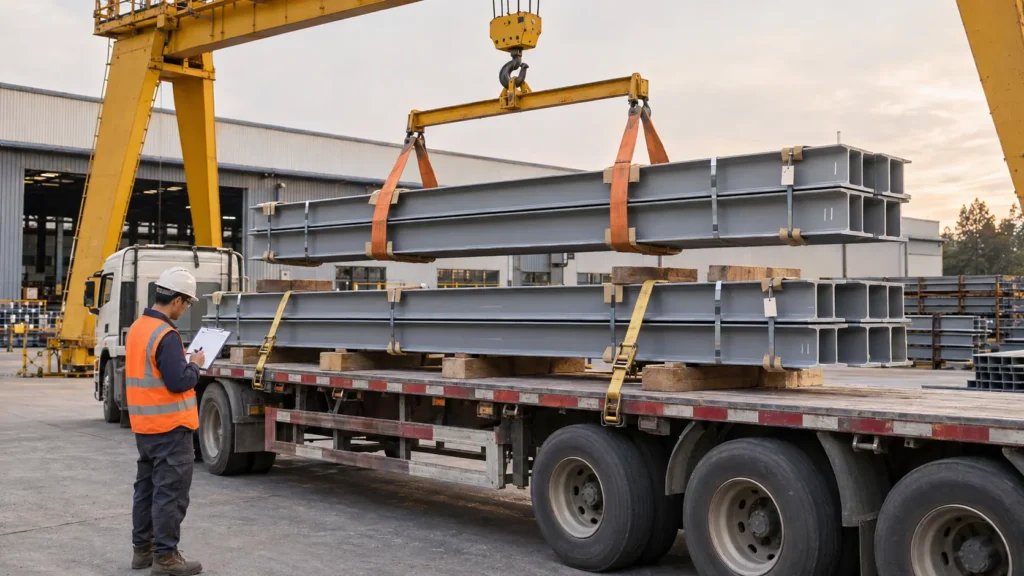
Even perfect steel can arrive damaged. At the final stage, confirm that:
- Every package carries clear marks matching the drawings and packing list
- Long members are bundled and supported to prevent bending
- Coated surfaces are protected from chafing and moisture
- Quantities match the packing list piece by piece
- Loading photos are taken before the container or truck is sealed
FAT Checklist at a Glance
| Area | What to verify | Evidence to collect |
|---|---|---|
| Documents | Drawings, MTCs, welding procedures, ITP | Document register, signed approvals |
| Materials | Grade, thickness, heat number traceability | MTCs matched to members |
| Dimensions | Length, camber, hole pitch, squareness | Measurement records |
| Welds | Visual inspection plus agreed NDT (UT, MPI, PT) | Inspection and NDT reports |
| Trial assembly | Fit-up, span, geometry, match marks | Photos, measurement sheet |
| Coatings | DFT or zinc thickness, defects | Coating reports, photos |
| Bolts and accessories | Quantity, grade, anchor layout | Packing list reconciliation |
| Packing and loading | Marking, protection, quantities | Loading photos, signed release |
What to Do When FAT Finds a Problem
Finding defects is the purpose of FAT, not a failure of it. What matters is how they are handled. A clear process includes:
- Record it. Issue a non-conformance report (NCR) describing the defect, location, and drawing reference.
- Classify it. Decide whether it is minor (for example, touch-up painting), repairable (for example, re-drilling or weld repair), or serious (for example, wrong section size).
- Agree on a fix. The supplier proposes a corrective action, and the buyer or inspector approves it before work starts.
- Re-inspect. The corrected item is checked again, and the result is recorded.
- Close the NCR. Shipment of the affected items is released only after closure.
Repairs should follow an approved procedure. For example, weld repairs should be done under a qualified procedure and re-tested by the same NDT method.
What a Good FAT Report Contains
A FAT report is your evidence file. At minimum, ask for:
- Project name, drawing numbers, revisions, and inspection dates
- Names of the inspectors and witnesses
- The checklist with actual readings, not just ticks
- NDT reports and coating measurements
- Trial assembly photos and measurement sheets
- Open and closed NCRs
- A signed release-to-ship statement
Keep this report with your project records. It is also valuable if a question arises later about workmanship or material.
Who Should Attend and When to Schedule FAT
FAT should happen after fabrication and coating are complete, and before final packing and shipment. The usual participants are the supplier’s QC team and your project or QC engineer. Many buyers also appoint an independent third-party inspection agency, especially for overseas orders. If you cannot travel, ask whether remote video inspection is possible for selected checks, such as packing and loading. Agree on the notice period, hold points, and the format of the final report in advance.
FAT Considerations by Building Type
Steel warehouses. Frames are often repetitive, so sampling is usually efficient: assemble a typical frame, check a defined percentage of members, and focus on anchor bolt layouts and secondary members.
Steel workshops. Welding or heavy-equipment workshops may carry crane loads or mezzanines. Check crane bracket positions and any members that carry heavy equipment.
Steel factories with cranes. Crane runway beams, brackets, and rail alignment have tighter fit requirements. Prioritize trial assembly of crane-supporting frames and check bracket positions against the crane supplier’s data.
Large-span buildings. Long rafters are often spliced, so splice connection accuracy and overall geometry matter more. Trial assembly of the spliced frame is strongly advisable.
Common FAT Mistakes to Avoid
- Inspecting after packing is finished. Re-opening bundles is slow and rarely done thoroughly.
- No agreed tolerances. Without them, every deviation becomes a debate.
- Leaving NDT scope undefined. Specify methods, joints, and percentages in the contract.
- Accepting verbal approvals. Every acceptance should be recorded and signed.
- Skipping anchor bolt checks. Foundation errors can undo perfect fabrication.
- Not closing out non-conformances. Defects should be corrected and re-inspected, not just noted.
- Treating FAT as a formality. It works only when it has real hold points and consequences.
How to Write FAT Into Your RFQ and Contract
To make FAT enforceable, include it in the request for quotation and the purchase agreement. Specify:
- The governing standards and acceptance criteria
- The ITP, with hold and witness points
- The NDT scope and who performs it
- Which frames or connections are trial assembled
- The notice period for inspection
- Rules for rework and re-inspection
- A signed release-to-ship document, ideally tied to the shipment or payment milestone
Red Flags When Evaluating a Supplier’s Quality Process
When you compare quotations, watch for these warning signs:
- Reluctance to share an inspection plan or sample inspection report
- No traceability between certificates and actual steel
- Refusal to allow third-party or buyer inspection
- Vague answers about tolerances, NDT, or trial assembly
- Pressure to ship before open issues are closed
A supplier that welcomes inspection and answers these questions clearly is usually easier to work with throughout the project.
Steel Building Solutions Where FAT Applies
FAT is relevant to any prefabricated steel building, but it matters most for complex, crane-equipped, or export projects. Welldone Steel’s Steel Factory Building solutions are custom-engineered around production layout, with an optional overhead crane system and H-section main frames. The company states that columns, rafters, and purlins are cut and welded in its own workshop. Its Steel Workshop Building range covers crane-ready clear-span frames for fabrication, assembly, and maintenance operations. Both product pages list ISO 9001, CE, and SGS certificates. For an example of an export factory project, see the Mali steel factory building project.
If you are comparing suppliers, include your inspection requirements in your inquiry, such as standards, witness points, third-party inspection, and trial assembly scope. A supplier’s response to those requirements tells you a lot about how it manages quality. To discuss your inspection requirements for a warehouse, workshop, or factory project, contact the Welldone Steel team.
Conclusion
Factory Acceptance Testing is the most cost-effective way to protect a steel building project from site-stage surprises. It confirms the documents, materials, dimensions, welds, coatings, and packing, and a trial assembly of key frames proves that the connections fit before anything leaves the plant. The best results come from agreeing the scope early, writing it into the contract, recording every acceptance, and closing every defect before shipment.
If you are planning a steel warehouse, workshop, or factory, share your drawings and inspection requirements with Welldone Steel. You can request a customized quotation or contact the team to discuss your project.